
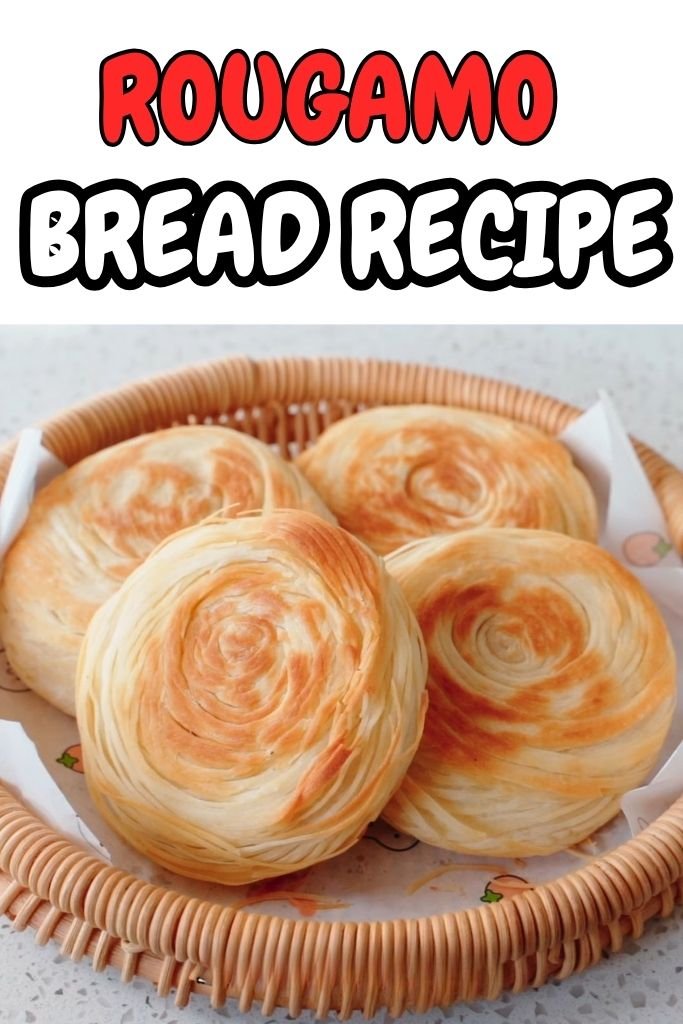
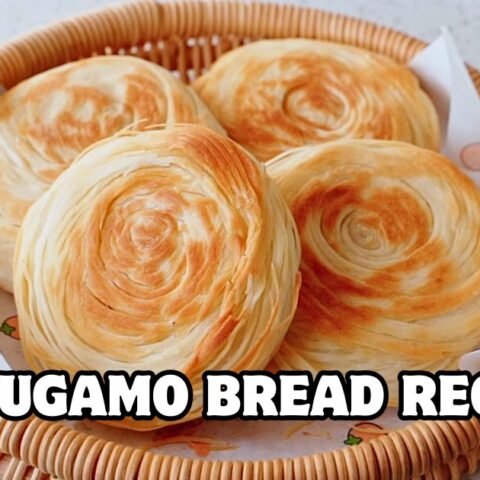
Rougamo Bread Recipe (Roujiamo – 肉夹馍)
Rougamo is a popular Chinese street food that comes from Shaanxi Province in China.
People call it the Chinese hamburger because it has meat inside a special bread. The bread is crispy outside but soft and fluffy inside.
Many people around the world now love this food. You can make this Rougamo Bread Recipe at home.
The bread has many layers that make it special. The taste is amazing. This recipe shows you how to make real rougamo bread in your own kitchen. You do not need to go to a restaurant.
The steps are easy to follow. Soon you will be eating this tasty Chinese bread at home.
What Is Rougamo Bread?
Rougamo Bread, also known as Roujiamo (肉夹馍), is a famous Chinese street food that means “meat stuffed bread.”
In Chinese, “Rou” means meat, “Jia” means stuffed, and “Mo” means bread. Together, it describes exactly what it is – warm flatbread filled with juicy, slow-cooked pork or beef.
It is usually pan-fried and then baked to give a rich golden color and light crunch.
The unique part is its texture – it’s firm enough to hold juicy fillings but still tender when you bite into it.
Rougamo is different from regular flatbreads like pita or naan because it’s made with a layered dough.
The layers trap small pockets of air, giving it a soft, chewy inside while staying crisp on the outside.
Types of Rougamo Breads
1. Baijimo (白吉馍) (The Classic Shaanxi Version): The Baijimo is the most common type used in Rougamo sandwiches. It’s baked until golden brown with a crisp crust and a soft, flaky middle. It’s often cooked on a flat pan and then finished in an oven to keep its texture perfect.
2. Northern Versions: In northern China, the bread tends to be thicker and chewier. It holds heavier fillings like braised beef or lamb with strong spices. The texture is dense but still full of layers.
3. Southern Versions: Southern-style Rougamo breads are lighter, thinner, and sometimes slightly sweet. They are often cooked on a skillet with oil instead of baked. This gives them a more delicate bite.
4. Cooking Method Differences: Some versions are baked, while others are pan-fried first. The baking style makes the bread more puffed and crispy, while pan-frying keeps it soft and tender. The cooking method changes how the sandwich feels and tastes – and that’s what makes Rougamo so interesting.
Rougamo Bread Ingredients
The ingredients for Rougamo bread are simple. Each one adds to the texture and taste. Substitutions are possible if some ingredients are not available.
- All-Purpose Flour (500 grams): This is the main part of your bread. Use regular white flour from any store. Bread flour works too. Bread flour makes the bread a bit chewier. But all-purpose flour works great.
- Baking Powder (5 grams): This helps the bread puff up a little. It makes the inside softer. Baking soda works as a substitute. Use the same amount. Just mix it with a tiny bit of vinegar first.
- Warm Water (230-250 grams): The water should feel warm on your hand. Not hot. Not cold. This helps the dough come together. Use less water for a drier dough. Use more water for a softer dough.
- Melted Lard (for brushing): Lard makes the bread super crispy. It also adds great taste. Butter works as an alternative. But lard works best. Some people use oil. Oil works okay but doesn’t make it as crispy.
- Salt (5 grams): Just a little bit for taste. You can skip it. But salt makes the bread taste better.
Equipment Needed for Making Rougamo
- Large mixing bowl – for making dough
- Rolling pin – to roll flat
- Clean kitchen towel – keeps dough moist
- Pastry brush – for spreading lard
- Sharp knife or wire cutter – cuts thin strips
- Non-stick pan or skillet – for cooking bread
- Baking sheet – holds bread in oven
- Oven – final cooking step
- Stand mixer (optional) – makes kneading easier
How to Make Rougamo Bread at Home
Step 1 | Make the Dough
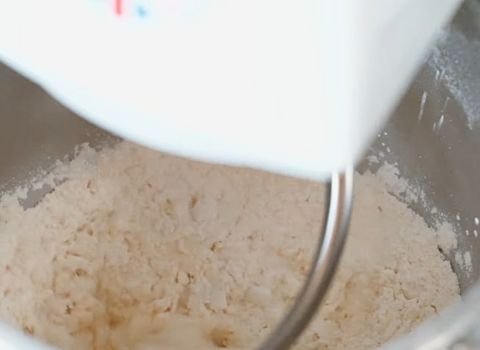
Put your flour in a big bowl. Add the baking powder and salt. Mix them together with your hand. Now add the warm water slowly. Start mixing with a spoon. When it gets thick, use your hands. Keep mixing until all the flour is wet.
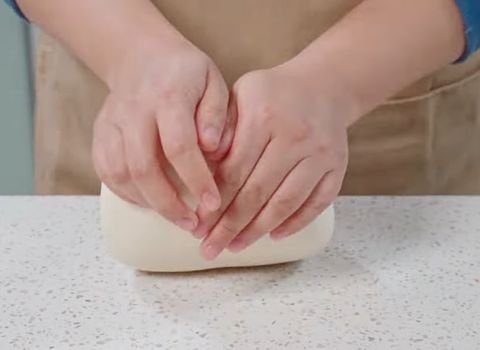
The dough will look rough at first. Keep kneading it in the bowl. Push it down with your palms. Fold it over. Push it again. Do this for about 5 minutes.
The dough should feel dry, not sticky. Rougamo bread needs dry dough. Don’t add too much water.
Step 2 | Knead Until Smooth
Now take the dough out of the bowl. Put it on a clean counter. You don’t need flour on the counter. The dough is dry enough.
Keep kneading with your hands. Push down and fold over. Turn it a little bit. Push and fold again. Do this for 10 more minutes.
After 10 minutes, the dough will look much smoother. The surface should be nice and even.
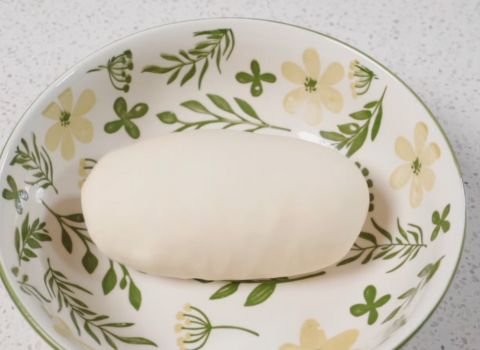
Now cover it with a damp towel. Let it sit for 20 minutes.
Step 3 | Knead Again
After 20 minutes, knead the dough one more time. This makes it even smoother. Just knead for 3 to 4 minutes this time. The dough should feel soft but still firm. Not sticky at all.
Cover it again. Let it rest for one whole hour at room temperature.
Step 4 | Divide the Dough
One hour has passed. Now cut your dough into 3 or 4 pieces. Smaller pieces are easier to work with. Keep the pieces you’re not using covered with the towel. They will dry out fast. Take one piece.
Roll it between your hands to make a long rope shape. The rope should be as long as your arm. Put it on the counter.
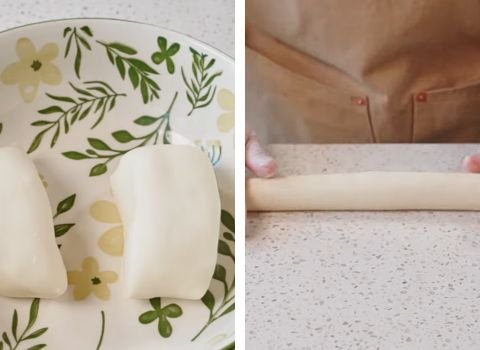
Step 5 | Roll Out the Dough
Get your rolling pin. Start rolling the dough rope flat. Roll it long, not wide. You want a long strip. Keep rolling until it’s very thin. You should almost see through it. Hold it up to the light. Can you see a little light coming through? That’s good!
Pull the dough gently as you roll. This makes it longer. The strip should be about 2 meters long. That’s really long! Don’t worry about the shape.
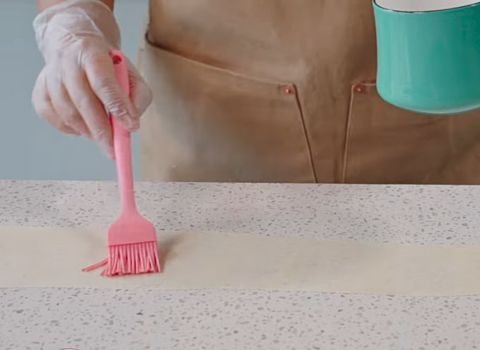
Step 6 | Brush with Lard
Melt some lard in a small bowl. Use a pastry brush. Brush a thin layer of melted lard all over the dough strip.
Start with half of the strip. Don’t use too much lard. Just a thin layer. The lard makes the bread crispy later.
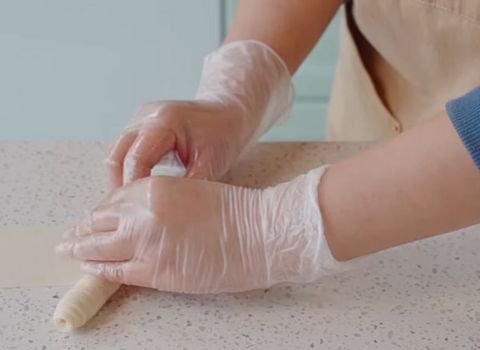
Step 7 | Roll It Up
Start rolling the dough strip from one end. Roll it like a sleeping bag. Make the roll a bit thick. Not too tight. Not too loose. Keep rolling until you get to the middle of your strip.
Now roll the dough left and right at the same time. This makes it longer and thinner. Keep going until you have a rope shape again.
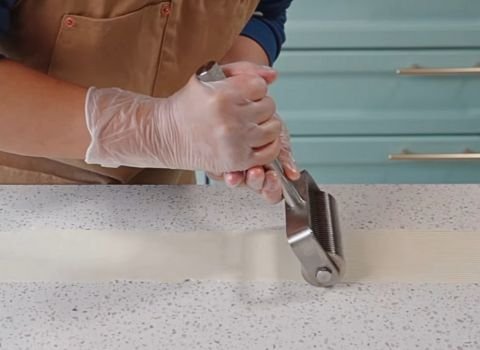
Step 8 | Cut into Strips
Take a knife or a wire cutter tool. Cut the remaining unrolled dough into very thin strips. Like noodles.
Try to make them as thin as you can. This takes practice. Don’t worry about perfect strips. Just do your best.
After cutting, brush these strips with a little more melted lard.
Step 9 | Continue Rolling
Keep rolling up the dough. Now you’re rolling up all those thin strips too. Roll from both sides toward the center. The strips should all get wrapped up inside. Keep going until everything is rolled into one big spiral.
The outside should have all those thin strips showing. Make sure no parts are left without strips on the outside.
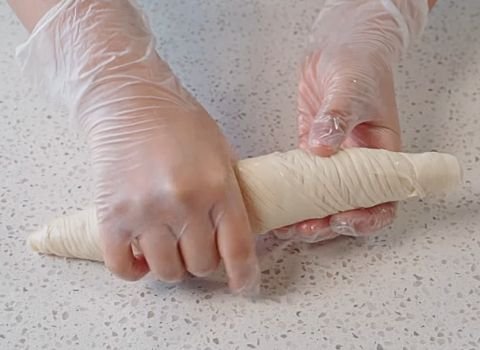
Step 10 | Divide and Shape
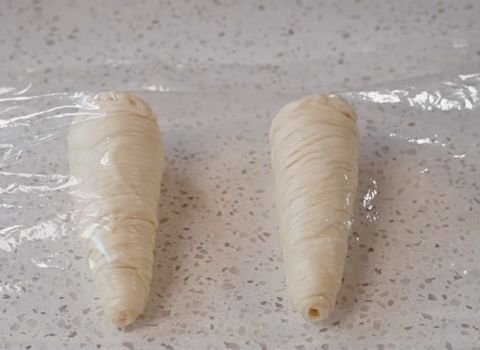
Cut the big spiral in half. You now have two pieces. Take one piece. Hold it in one hand. Use your other hand to twist it around and around. Keep twisting until it breaks off naturally.
Press the bottom closed with your fingers. You should have a round, thick disk shape. It will be tall. That’s perfect. Put it down and cover it. Do the same thing with all your other dough pieces.
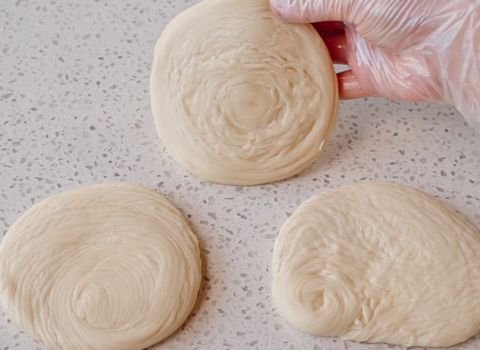
Step 11 | Flatten the Dough
Let all the dough disks rest for 10 minutes. They’re pretty tall right now. Take one disk. Press down on it gently with your hand. Try to press the pointy part in the middle. Don’t press too hard. You don’t want to smash it completely. Just flatten it a bit.
Now use your rolling pin. Roll it into a circle. The circle should be about as thick as your finger. Turn the dough over while you roll. This keeps those nice layers inside from getting messed up.
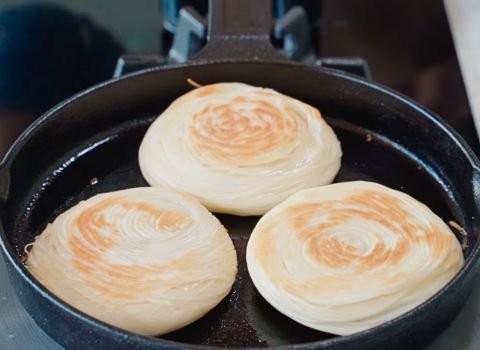
Step 12 | Pan Fry the Bread
Heat a pan on medium-low heat. Add a tiny bit of lard to the pan. Put your bread circle in the pan with the bottom side down. Let it cook for about 2 minutes. You’ll see the bottom turn a light golden color. Don’t let it get too dark.
Flip it over. Cook the other side for 2 minutes. The bread should start to puff up a little. Some small bubbles might appear. That’s good!
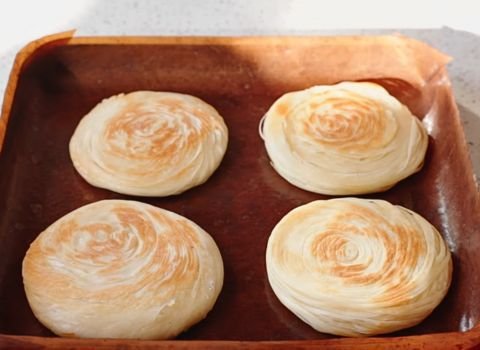
Step 13 | Bake in the Oven
Turn on your oven to 230 degrees. Let it heat up for at least 15 minutes before you use it.
Put your pan-fried bread on a baking sheet. Put the sheet in the middle of the oven. Bake for 10 to 15 minutes. The outside should turn golden and crispy. Take it out of the oven. Your Rougamo Bread Recipe is done!
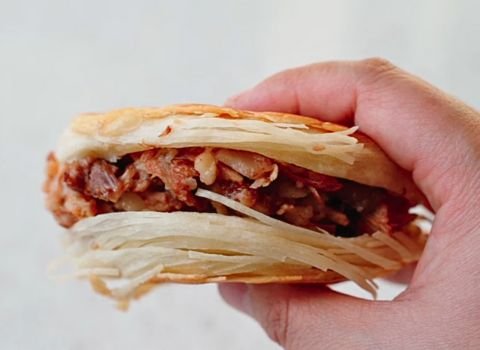
Step 14 | Add Filling and Serve
Let the bread cool for just 2 to 3 minutes. Don’t wait too long. It tastes best when hot. Take a sharp knife. Cut the bread open from one side. Be careful. The steam inside is very hot. Open it like a pocket.
Now add your favourite filling. Close the bread gently. Serve it right away while it’s hot and crispy.
Tips for Making Perfect Rougamo Bread
- Use Bread Flour if You Can: If you have bread flour, use it instead of all-purpose flour. The higher gluten helps create more stretch and better flaky layers.
- Check the Dough by Touch: If you’re unsure about the dough texture, press it gently with your finger. It should spring back slowly but not stick. That’s when it’s ready.
- Keep the Dough Covered at All Times: Even a few minutes of air exposure can dry the dough surface. Always keep unused pieces covered with a damp towel while you work.
- Roll in a Cool Room: If your kitchen is hot, the lard can melt too fast while rolling. Try working in a cooler room or take short breaks to keep the layers from sticking.
- Use a Pastry Brush for Even Lard Coating: If you don’t have one, use the back of a spoon – but make sure the layer is thin and even. Thick spots of lard can cause uneven baking.
Traditional Fillings for Rougamo
1. Classic Pork Belly (La Zhi Rou): The most popular filling. Pork belly is slow-cooked with spices like star anise, cinnamon, and bay leaves until tender. Some add chili oil. Juicy, flavorful meat makes the bread extra delicious.
2. Beef and Lamb: Some regions use beef, which is leaner, or lamb, popular in Muslim areas. Lamb is spiced with cumin for a stronger taste. Both are great alternatives to pork.
3. Vegetarian Options: Tofu, mushrooms, or eggplant with garlic sauce make tasty meat-free fillings. Pickled vegetables add a crunchy, tangy bite.
4. Regional Variations: Shaanxi sticks to pork, Xinjiang prefers cumin-spiced lamb, and Sichuan loves spicy peppers. Each region has its own twist, or you can create your own filling.
Serving Suggestions and Pairings
Serve the Rougamo bread hot. Cut it open from one side. Don’t cut all the way through. Leave the other side connected. This makes a pocket inside. The pocket holds all your filling.
Now fill it with your choice of meat (slow-cooked pork, beef). Add some chopped cilantro. A little bit of chili oil makes it even better. Some people add pickled vegetables. These add a sour, crunchy taste.
This bread goes well with hot soup. Try it with a simple broth. The bread is rich. The soup cleans your mouth between bites. You can also serve it with cold noodles.
In China, people eat this for breakfast, lunch, or dinner. It works any time.
Serve it with hot tea. Green tea or black tea both work well. The tea cuts through the rich taste of the meat and lard.
Storage and Reheating Instructions
Rougamo bread stays fresh for about 2 days at room temperature if kept in an airtight container. To store longer, place the bread in a sealed bag and refrigerate for up to 5 days.
For best reheating results, warm the bread in a dry skillet over medium heat for a few minutes on each side. This helps restore the crisp texture. Avoid microwaving, as it makes the bread soft and chewy.
To freeze, place each piece between parchment paper and store in a freezer bag. When ready to use, thaw at room temperature and then reheat in the oven or skillet. Properly stored, frozen rougamo bread can last up to 2 months.
Rougamo Bread Recipe FAQs
1. Why was my bread heavy?
Heavy bread usually means the dough was too wet or under-kneaded. Rougamo dough needs to be firm. Make sure to knead long enough to build elasticity. Also, resting the dough helps it relax, making it lighter after baking.
2. Why was my bread dry?
Dry bread can happen if baked too long or at too low a temperature. Always bake in a fully preheated oven at 230°C (450°F).
Also, brushing a bit of oil before baking helps retain moisture inside the layers.
3. Where can I buy Chinese rougamo bread?
You can find ready-made rougamo bread in Chinese supermarkets or online Asian grocery stores.
Look for “Baijimo” or “Roujiamo Bread” in the frozen section. They can be reheated in the oven for a fresh taste.
4. Can I make the dough without an oven?
Yes, you can. The traditional way is to cook it completely on a stovetop. After the first flip in the pan, turn the heat to low.
Continue cooking the bread for another 5-7 minutes, flipping it now and then. Put a lid on the pan for part of the time. This traps steam and helps the bread cook all the way through without burning.
5. My bread did not puff up. What went wrong?
The main reason bread does not puff up is the oven was not hot enough. Always preheat your oven fully.
It should be at the right temperature before the bread goes in. Also, when you press the dough coil into a disk, do not press too hard.
You want to keep the layers you created. Pressing too hard can smash them together.
Rougamo Bread Recipe
Learn how to make Rougamo Bread in 2 hours! Crispy outside, soft inside, layered bread perfect for any filling. Easy homemade Chinese recipe.
Ingredients
- All-Purpose Flour: 500 grams (or bread flour for chewier texture)
- Baking Powder: 5 grams (or baking soda + a tiny bit of vinegar)
- Warm Water: 230–250 grams
- Melted Lard: for brushing (substitute butter or oil if needed)
- Salt: 5 grams
Instructions
- Put your flour in a big bowl. Add the baking powder and salt. Mix them together with your hand. Now add the warm water slowly. Start mixing with a spoon. When it gets thick, use your hands. Keep mixing until all the flour is wet. The dough will look rough at first. Keep kneading it in the bowl. Push it down with your palms. Fold it over. Push it again. Do this for about 5 minutes. The dough should feel dry, not sticky. Rougamo bread needs dry dough. Don't add too much water.
- Now take the dough out of the bowl. Put it on a clean counter. You don't need flour on the counter. The dough is dry enough. Keep kneading with your hands. Push down and fold over. Turn it a little bit. Push and fold again. Do this for 10 more minutes. After 10 minutes, the dough will look much smoother. The surface should be nice and even. Now cover it with a damp towel. Let it sit for 20 minutes.
- After 20 minutes, knead the dough one more time. This makes it even smoother. Just knead for 3 to 4 minutes this time. The dough should feel soft but still firm. Not sticky at all. Cover it again. Let it rest for one whole hour at room temperature.
- One hour has passed. Now cut your dough into 3 or 4 pieces. Smaller pieces are easier to work with. Keep the pieces you're not using covered with the towel. They will dry out fast. Take one piece. Roll it between your hands to make a long rope shape. The rope should be as long as your arm. Put it on the counter.
- Get your rolling pin. Start rolling the dough rope flat. Roll it long, not wide. You want a long strip. Keep rolling until it's very thin. You should almost see through it. Hold it up to the light. Can you see a little light coming through? That's good! Pull the dough gently as you roll. This makes it longer. The strip should be about 2 meters long. That's really long! Don't worry about the shape.
- Melt some lard in a small bowl. Use a pastry brush. Brush a thin layer of melted lard all over the dough strip. Start with half of the strip. Don't use too much lard. Just a thin layer. The lard makes the bread crispy later.
- Start rolling the dough strip from one end. Roll it like a sleeping bag. Make the roll a bit thick. Not too tight. Not too loose. Keep rolling until you get to the middle of your strip. Now roll the dough left and right at the same time. This makes it longer and thinner. Keep going until you have a rope shape again.
- Take a knife or a wire cutter tool. Cut the remaining unrolled dough into very thin strips. Like noodles. Try to make them as thin as you can. This takes practice. Don't worry about perfect strips. Just do your best. After cutting, brush these strips with a little more melted lard.
- Keep rolling up the dough. Now you're rolling up all those thin strips too. Roll from both sides toward the center. The strips should all get wrapped up inside. Keep going until everything is rolled into one big spiral. The outside should have all those thin strips showing. Make sure no parts are left without strips on the outside.
- Cut the big spiral in half. You now have two pieces. Take one piece. Hold it in one hand. Use your other hand to twist it around and around. Keep twisting until it breaks off naturally. Press the bottom closed with your fingers. You should have a round, thick disk shape. It will be tall. That's perfect. Put it down and cover it. Do the same thing with all your other dough pieces.
- Let all the dough disks rest for 10 minutes. They're pretty tall right now. Take one disk. Press down on it gently with your hand. Try to press the pointy part in the middle. Don't press too hard. You don't want to smash it completely. Just flatten it a bit. Now use your rolling pin. Roll it into a circle. The circle should be about as thick as your finger. Turn the dough over while you roll. This keeps those nice layers inside from getting messed up.
- Heat a pan on medium-low heat. Add a tiny bit of lard to the pan. Put your bread circle in the pan with the bottom side down. Let it cook for about 2 minutes. You'll see the bottom turn a light golden color. Don't let it get too dark. Flip it over. Cook the other side for 2 minutes. The bread should start to puff up a little. Some small bubbles might appear. That's good!
- Turn on your oven to 230 degrees. Let it heat up for at least 15 minutes before you use it. Put your pan-fried bread on a baking sheet. Put the sheet in the middle of the oven. Bake for 10 to 15 minutes. The outside should turn golden and crispy. Take it out of the oven. Your Rougamo Bread Recipe is done!
- Let the bread cool for just 2 to 3 minutes. Don't wait too long. It tastes best when hot. Take a sharp knife. Cut the bread open from one side. Be careful. The steam inside is very hot. Open it like a pocket. Now add your favourite filling. Close the bread gently. Serve it right away while it's hot and crispy.
Nutrition Information:
Serving Size: 1Amount Per Serving: Calories: 260Total Fat: 8gSaturated Fat: 3.5gSodium: 250mgCarbohydrates: 41gFiber: 2gSugar: 1gProtein: 7g
This Rougamo bread recipe makes a crispy, layered bread that is great with any filling you like.
Making it is simple, and the bread turns out very tasty. You can change the fillings to whatever you enjoy.
I would love to hear how it turns out for you.